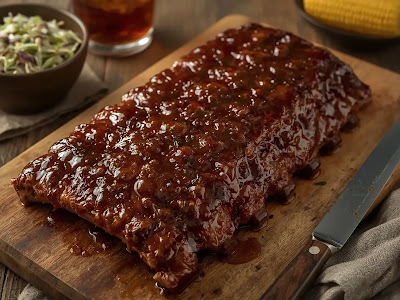
Are you ready to transform your weeknight dinner into an extraordinary culinary event? Get ready to unlock the secret to the crispiest, juiciest chicken you've ever tasted: Chicken Under a Brick! This isn't just a clever name; it's a game-changing technique that applies gentle, even pressure to a whole chicken, ensuring every inch of skin becomes shatteringly crisp while the meat remains incredibly tender and moist. Forget dry, unevenly cooked poultry – with this method, perfection is practically guaranteed.
But we're not stopping there! This ultimate guide pairs your magnificent brick chicken with a simple yet exquisite pan sauce, crafted right in the same skillet to capture all those incredible flavors. And to round out this spectacular meal, we're serving it alongside a vibrant, hearty bean salad – a symphony of textures and tastes that perfectly complements the rich chicken. This isn't just a recipe; it's an experience, a journey into flavor and texture that will leave your family and friends absolutely raving. So, grab your apron, gather your ingredients, and let's embark on this delicious adventure together. You're about to become a brick chicken connoisseur!
- Prep Time: 30 minutes
- Cook Time: 45 minutes
- Total Time: 1 hour 15 minutes
- Servings: 4
- Difficulty: Intermediate
Ingredients for Your Ultimate Chicken Under a Brick Feast
Gathering your ingredients is the first step to culinary success. We've broken down everything you'll need for each component of this sensational meal. Remember, fresh, high-quality ingredients truly make a difference!
For the Crispy Chicken Under a Brick:
- 1 (3- to 3 1/2-pound) whole chicken
- 2 tablespoons olive oil
- 2 teaspoons kosher salt, plus more for seasoning
- 1 teaspoon black pepper, freshly ground
- 1 teaspoon smoked paprika (optional, for extra flavor and color)
- 2 foil-wrapped bricks (or heavy cast iron skillet)
For the Simple Pan Sauce:
- 1 cup chicken broth, low-sodium
- 1/2 cup dry white wine (like Sauvignon Blanc or Pinot Grigio), or additional chicken broth
- 2 tablespoons unsalted butter, cold and cut into cubes
- 1 shallot, minced
- 1 sprig fresh thyme or rosemary
- Pinch of red pepper flakes (optional, for a subtle kick)
For the Hearty Bean Salad:
- 1 (15-ounce) can chickpeas, rinsed and drained
- 1 (15-ounce) can cannellini beans, rinsed and drained
- 1/2 red onion, finely diced
- 1/2 cup fresh parsley, chopped
- 1/4 cup fresh mint, chopped (optional, but highly recommended for freshness)
- 2 tablespoons red wine vinegar
- 3 tablespoons extra-virgin olive oil
- 1 teaspoon Dijon mustard
- Salt and freshly ground black pepper to taste
Master the Art: Step-by-Step Instructions for Crispy Chicken & More
Now for the fun part! Follow these detailed steps to create your magnificent chicken under a brick with a delectable pan sauce and a vibrant bean salad. We've included some pro tips to ensure perfect results every time.
Part 1: Preparing and Dry Brining the Chicken (The Secret to Ultimate Crispiness)
- Spatchcock the Chicken: This is our first pro technique! Spatchcocking, or butterflying, the chicken helps it cook more evenly and makes it easier to press flat.
- Place the chicken breast-side down on a cutting board.
- Using sturdy kitchen shears, cut along both sides of the backbone from tail to neck. Remove the backbone (you can save it for stock!).
- Flip the chicken over so it's breast-side up.
- Press down firmly on the breastbone with the heel of your hand until you hear a crack and the chicken lies flat. This creates a more uniform thickness for even cooking.
- Dry Brine for Flavor and Crispness: This critical step enhances flavor and draws moisture from the skin, leading to unparalleled crispiness.
- Pat the spatchcocked chicken thoroughly dry with paper towels – every nook and cranny. This is crucial for crisp skin!
- In a small bowl, combine 2 teaspoons of kosher salt, 1 teaspoon of black pepper, and 1 teaspoon of smoked paprika (if using).
- Generously season both sides of the chicken with this mixture, rubbing it gently into the skin.
- Place the chicken, skin-side up, on a wire rack set inside a baking sheet.
- Refrigerate, uncovered, for at least 4 hours, or ideally overnight (up to 24 hours). The dry air in the fridge will further dehydrate the skin, and the salt will penetrate the meat, making it more flavorful and tender.
Part 2: Cooking the Chicken Under a Brick
- Prepare for Cooking:
- About 30 minutes before cooking, remove the chicken from the refrigerator to bring it closer to room temperature. This helps with more even cooking.
- Preheat your oven to 425°F (220°C).
- Ensure your bricks are wrapped tightly in aluminum foil. If using a heavy cast iron skillet, have it ready.
- Sear for Golden Perfection:
- Heat 2 tablespoons of olive oil in a large (12-inch) oven-safe skillet, preferably cast iron, over medium-high heat until shimmering.
- Carefully place the chicken, skin-side down, into the hot skillet. It should sizzle immediately.
- Place the foil-wrapped bricks directly on top of the chicken, pressing it down firmly. If using a cast iron skillet, place it on top of the chicken, perhaps with a weight inside.
- Cook on the stovetop for 10-12 minutes without moving, allowing the skin to develop a deep, golden-brown crust. Listen for the aggressive sizzling – that's the sound of crispy skin forming!
- Roast to Doneness:
- Carefully remove the bricks or heavy skillet.
- Flip the chicken over so it's breast-side up.
- Transfer the skillet with the chicken to the preheated oven.
- Roast for 30-35 minutes, or until an instant-read thermometer inserted into the thickest part of the thigh (avoiding bone) registers 165°F (74°C). The skin should be incredibly crispy and the juices should run clear.
- Rest the Chicken: This is our final pro technique for succulent meat!
- Once cooked, carefully remove the chicken from the skillet and transfer it to a clean cutting board.
- Tent loosely with foil and let it rest for at least 10-15 minutes. This allows the juices to redistribute throughout the meat, ensuring every bite is moist and flavorful. Do NOT skip this step!
Part 3: Crafting the Simple Pan Sauce
- Sauté Aromatics: While the chicken rests, carefully pour off all but about 1-2 tablespoons of the rendered chicken fat from the skillet. Keep the flavorful fond (brown bits) stuck to the bottom.
- Return the skillet to medium heat.
- Add the minced shallot and fresh thyme or rosemary sprig to the skillet.
- Sauté for 2-3 minutes, stirring occasionally, until the shallot is softened and fragrant. If using, add a pinch of red pepper flakes.
- Deglaze with Wine and Broth:
- Pour in the white wine (or extra chicken broth). Use a wooden spoon to scrape up all those delicious browned bits from the bottom of the pan – this is where all the concentrated flavor lives!
- Let the wine simmer and reduce by half, about 2-3 minutes, to burn off the alcohol.
- Add the chicken broth and bring to a simmer. Cook for another 5 minutes, allowing the sauce to reduce slightly and thicken.
- Finish with Butter:
- Remove the skillet from the heat.
- Whisk in the cold cubes of unsalted butter, one at a time, until fully incorporated and the sauce is glossy and slightly emulsified. This "mounts" the sauce, adding richness and shine.
- Remove the thyme or rosemary sprig.
- Taste and adjust seasoning with salt and pepper as needed.
Part 4: Assembling the Hearty Bean Salad
- Prepare the Vinaigrette: In a large bowl, whisk together the red wine vinegar, extra-virgin olive oil, and Dijon mustard. Season with a pinch of salt and pepper.
- Combine Ingredients: Add the rinsed and drained chickpeas, cannellini beans, finely diced red onion, chopped parsley, and chopped mint (if using) to the bowl with the vinaigrette.
- Toss and Season: Toss everything gently until well combined and evenly coated. Taste and adjust seasoning as needed. The salad can be made ahead and stored in the refrigerator for up to 3 days, allowing the flavors to meld even further.
Part 5: Serving Your Feast
- Carve the rested chicken into individual pieces (quarters or eighths).
- Arrange the carved chicken on a platter. Drizzle generously with the warm pan sauce.
- Serve immediately with generous portions of the vibrant hearty bean salad on the side. Get ready for applause!
This meal is a true testament to how simple techniques, when executed thoughtfully, can elevate everyday ingredients into something truly extraordinary. Enjoy every crispy, juicy, flavorful bite!
Conclusion
There you have it – the ultimate guide to creating a show-stopping Chicken Under a Brick with a luscious pan sauce and a refreshing bean salad. This meal proves that with a few smart techniques like spatchcocking, dry brining, and proper resting, you can achieve restaurant-quality results right in your own kitchen. The crispy skin, the succulent meat, the savory sauce, and the vibrant salad come together in a symphony of flavors and textures that's both comforting and gourmet. Impress your family, delight your friends, and treat yourself to this incredible culinary experience. For the original recipe and more fantastic ideas, be sure to visit Food Network at https://www.foodnetwork.com/recipes/food-network-kitchen/chicken-under-a-brick-with-simple-pan-sauce-and-hearty-bean-salad-21543285!
FAQ
Q1: Why use bricks for cooking chicken? A1: Bricks (or any heavy, oven-safe object like a cast iron skillet) provide even, direct pressure across the entire chicken, ensuring maximum contact with the hot pan. This results in incredibly crispy skin and helps the chicken cook more uniformly, preventing dry spots while sealing in juices.
Q2: Can I prepare any part of this meal ahead of time? A2: Absolutely! The dry brining for the chicken can be done up to 24 hours in advance, enhancing flavor and crispiness. The hearty bean salad is also fantastic made a day or two ahead, as the flavors have more time to meld. The chicken and pan sauce are best made fresh for optimal crispness and warmth.
Q3: What if I don't have bricks or a heavy cast iron skillet to press the chicken? A3: No problem! You can improvise by wrapping any heavy, oven-safe objects (like a foil-wrapped large can of tomatoes, a brick-shaped rock, or even another sturdy pot filled with water) in aluminum foil to create your weight. The key is applying firm, even pressure to flatten the chicken against the hot pan.

.png)


.png)